Using multiple nodes
When deploying multiple Socket.IO servers, there are two things to take care of:
- enabling sticky session, if HTTP long-polling is enabled (which is the default): see below
- using the Redis adapter (or another compatible Adapter): see below
Sticky load balancing
If you plan to distribute the load of connections among different processes or machines, you have to make sure that all requests associated with a particular session ID reach the process that originated them.
Why is sticky-session required
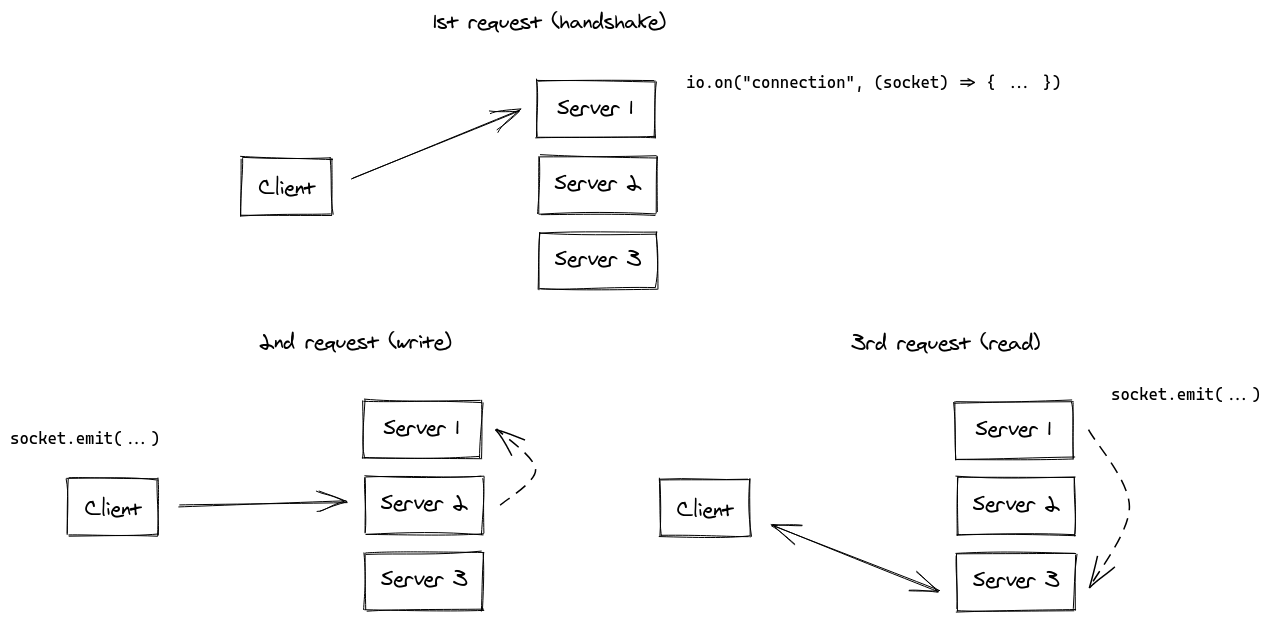
This is because the HTTP long-polling transport sends multiple HTTP requests during the lifetime of the Socket.IO session.
In fact, Socket.IO could technically work without sticky sessions, with the following synchronization (in dashed lines):

While obviously possible to implement, we think that this synchronization process between the Socket.IO servers would result in a big performance hit for your application.
Remarks:
- without enabling sticky-session, you will experience HTTP 400 errors due to "Session ID unknown"
- the WebSocket transport does not have this limitation, since it relies on a single TCP connection for the whole session. Which means that if you disable the HTTP long-polling transport (which is a perfectly valid choice in 2021), you won't need sticky sessions:
const socket = io("https://io.yourhost.com", {
  // WARNING: in that case, there is no fallback to long-polling
  transports: [ "websocket" ] // or [ "websocket", "polling" ] (the order matters)
});
Documentation: transports
Enabling sticky-session
To achieve sticky-session, there are two main solutions:
- routing clients based on a cookie (recommended solution)
- routing clients based on their originating address
You will find below some examples with common load-balancing solutions:
- NginX (IP-based)
- Apache HTTPD (cookie-based)
- HAProxy (cookie-based)
- Traefik (cookie-based)
- Node.js
clustermodule
For other platforms, please refer to the relevant documentation:
- Kubernetes: https://kubernetes.github.io/ingress-nginx/examples/affinity/cookie/
- AWS (Application Load Balancers): https://docs.aws.amazon.com/elasticloadbalancing/latest/application/load-balancer-target-groups.html#sticky-sessions
- GCP: https://cloud.google.com/load-balancing/docs/backend-service#session_affinity
- Heroku: https://devcenter.heroku.com/articles/session-affinity
Important note: if you are in a CORS situation (the front domain is different from the server domain) and session affinity is achieved with a cookie, you need to allow credentials:
Server
const io = require("socket.io")(httpServer, {
  cors: {
    origin: "https://front-domain.com",
    methods: ["GET", "POST"],
    credentials: true
  }
});
Client
const io = require("socket.io-client");
const socket = io("https://server-domain.com", {
  withCredentials: true
});
Without it, the cookie will not be sent by the browser and you will experience HTTP 400 "Session ID unknown" responses. More information here.
NginX configuration
Within the http { } section of your nginx.conf file, you can declare a upstream section with a list of Socket.IO process you want to balance load between:
http {
  server {
    listen 3000;
    server_name io.yourhost.com;

    location / {
      proxy_set_header X-Forwarded-For $proxy_add_x_forwarded_for;
      proxy_set_header Host $host;

      proxy_pass http://nodes;

      # enable WebSockets
      proxy_http_version 1.1;
      proxy_set_header Upgrade $http_upgrade;
      proxy_set_header Connection "upgrade";
    }
  }

  upstream nodes {
    # enable sticky session with either "hash" (uses the complete IP address)
    hash $remote_addr consistent;
    # or "ip_hash" (uses the first three octets of the client IPv4 address, or the entire IPv6 address)
    # ip_hash;
    # or "sticky" (needs commercial subscription)
    # sticky cookie srv_id expires=1h domain=.example.com path=/;

    server app01:3000;
    server app02:3000;
    server app03:3000;
  }
}
Notice the hash instruction that indicates the connections will be sticky.
Make sure you also configure worker_processes in the topmost level to indicate how many workers NginX should use. You might also want to look into tweaking the worker_connections setting within the events { } block.
Links:
Apache HTTPD configuration
Header add Set-Cookie "SERVERID=sticky.%{BALANCER_WORKER_ROUTE}e; path=/" env=BALANCER_ROUTE_CHANGED

<Proxy "balancer://nodes_polling">
    BalancerMember "http://app01:3000" route=app01
    BalancerMember "http://app02:3000" route=app02
    BalancerMember "http://app03:3000" route=app03
    ProxySet stickysession=SERVERID
</Proxy>

<Proxy "balancer://nodes_ws">
    BalancerMember "ws://app01:3000" route=app01
    BalancerMember "ws://app02:3000" route=app02
    BalancerMember "ws://app03:3000" route=app03
    ProxySet stickysession=SERVERID
</Proxy>

RewriteEngine On
RewriteCond %{HTTP:Upgrade} =websocket [NC]
RewriteRule /(.*) balancer://nodes_ws/$1 [P,L]
RewriteCond %{HTTP:Upgrade} !=websocket [NC]
RewriteRule /(.*) balancer://nodes_polling/$1 [P,L]

ProxyTimeout 3
Links:
HAProxy configuration
# Reference: http://blog.haproxy.com/2012/11/07/websockets-load-balancing-with-haproxy/

listen chat
  bind *:80
  default_backend nodes

backend nodes
  option httpchk HEAD /health
  http-check expect status 200
  cookie io prefix indirect nocache # using the `io` cookie set upon handshake
  server app01 app01:3000 check cookie app01
  server app02 app02:3000 check cookie app02
  server app03 app03:3000 check cookie app03
Links:
Traefik
Using container labels:
# docker-compose.yml
services:
  traefik:
    image: traefik:2.4
    volumes:
      - /var/run/docker.sock:/var/run/docker.sock
    links:
      - server

  server:
    image: my-image:latest
    labels:
      - "traefik.http.routers.my-service.rule=PathPrefix(`/`)"
      - traefik.http.services.my-service.loadBalancer.sticky.cookie.name=server_id
      - traefik.http.services.my-service.loadBalancer.sticky.cookie.httpOnly=true
With the File provider:
## Dynamic configuration
http:
  services:
    my-service:
      rule: "PathPrefix(`/`)"
      loadBalancer:
        sticky:
          cookie:
            name: server_id
            httpOnly: true
Links:
Using Node.js Cluster
Just like NginX, Node.js comes with built-in clustering support through the cluster module.
There are several solutions, depending on your use case:
| NPM package | How it works |
|---|---|
@socket.io/sticky | the routing is based on the sid query parameter |
sticky-session | the routing is based on connection.remoteAddress |
socketio-sticky-session | the routing based on the x-forwarded-for header) |
Example with @socket.io/sticky:
const cluster = require("cluster");
const http = require("http");
const { Server } = require("socket.io");
const redisAdapter = require("socket.io-redis");
const numCPUs = require("os").cpus().length;
const { setupMaster, setupWorker } = require("@socket.io/sticky");

if (cluster.isMaster) {
  console.log(`Master ${process.pid} is running`);

  const httpServer = http.createServer();
  setupMaster(httpServer, {
    loadBalancingMethod: "least-connection", // either "random", "round-robin" or "least-connection"
  });
  httpServer.listen(3000);

  for (let i = 0; i < numCPUs; i++) {
    cluster.fork();
  }

  cluster.on("exit", (worker) => {
    console.log(`Worker ${worker.process.pid} died`);
    cluster.fork();
  });
} else {
  console.log(`Worker ${process.pid} started`);

  const httpServer = http.createServer();
  const io = new Server(httpServer);
  io.adapter(redisAdapter({ host: "localhost", port: 6379 }));
  setupWorker(io);

  io.on("connection", (socket) => {
    /* ... */
  });
}
Passing events between nodes
The Redis adapter
Now that you have multiple Socket.IO nodes accepting connections, if you want to broadcast events to all clients (or to the clients in a certain room) you’ll need some way of passing messages between processes or computers.
The interface in charge of routing messages is what we call the Adapter. You can implement your own on top of the socket.io-adapter (by inheriting from it) or you can use the one we provide on top of Redis: socket.io-redis:
const io = require("socket.io")(3000);
const redis = require("socket.io-redis");
io.adapter(redis({ host: "localhost", port: 6379 }));
Then the following call:
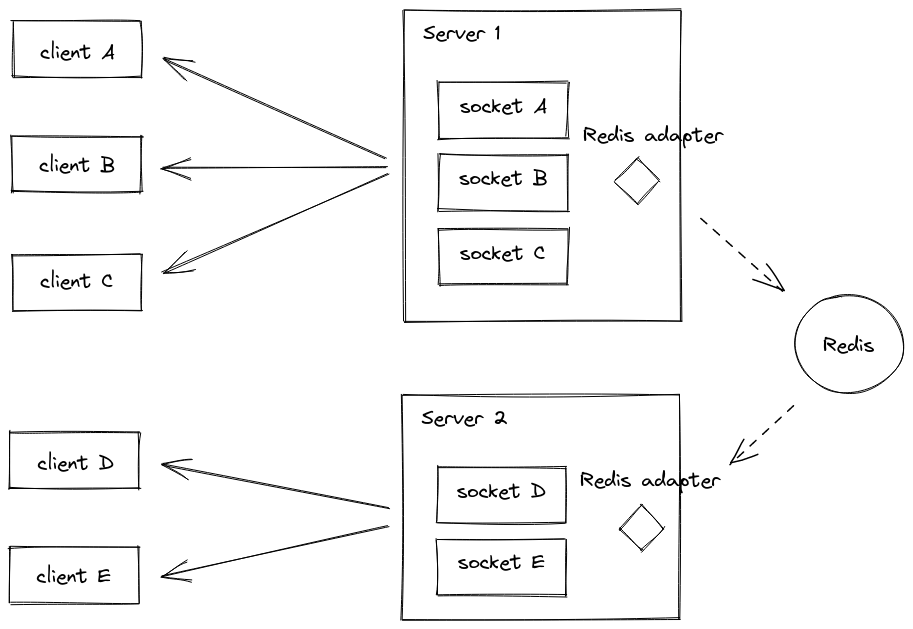
io.emit("hi", "all sockets");
will be broadcast to every clients through the Pub/Sub mechanism of Redis:

Sending messages from the outside world
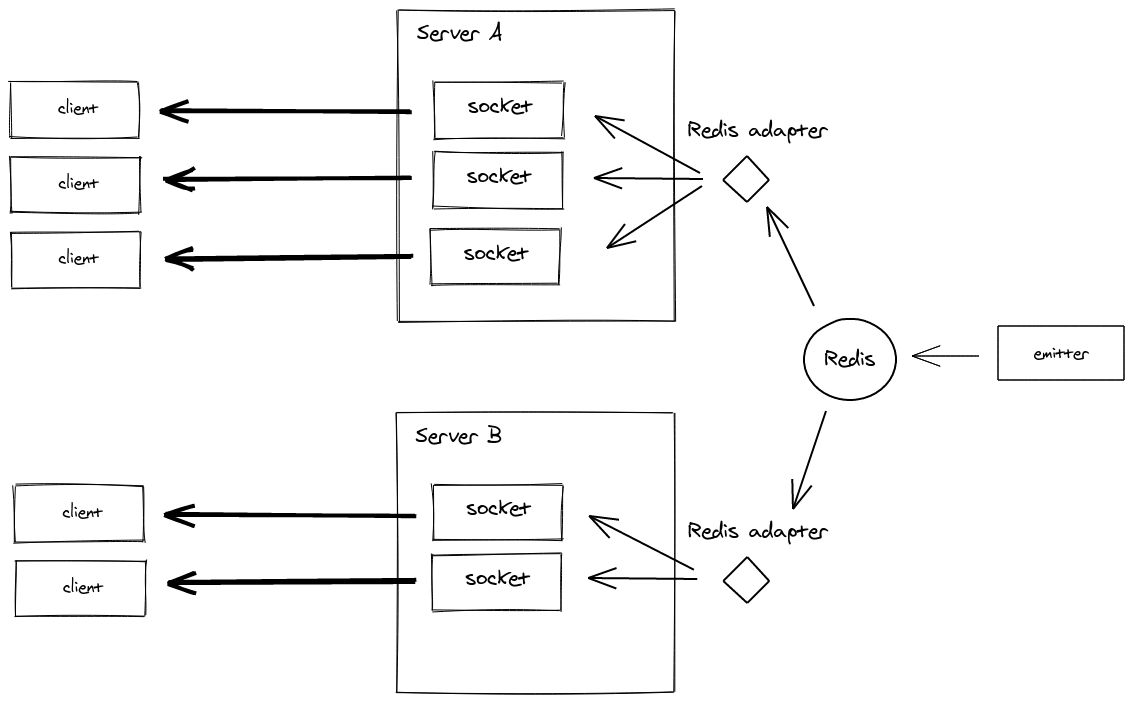
Using the Redis adapter has another benefit: you can now emit events from outside the context of your Socket.IO processes.

This emitter is available in several languages:
- Javascript: https://github.com/socketio/socket.io-emitter
- Java: https://github.com/sunsus/socket.io-java-emitter
- Python: https://pypi.org/project/socket.io-emitter/
- PHP: https://github.com/rase-/socket.io-php-emitter
- Golang: https://github.com/yosuke-furukawa/socket.io-go-emitter
- Perl: https://metacpan.org/pod/SocketIO::Emitter
- Rust: https://github.com/epli2/socketio-rust-emitter